Categories
Posts in this category
- Automating Deployments: A New Year and a Plan
- Automating Deployments: Why bother?
- Automating Deployments: Simplistic Deployment with Git and Bash
- Automating Deployments: Building Debian Packages
- Automating Deployments: Debian Packaging for an Example Project
- Automating Deployments: Distributing Debian Packages with Aptly
- Automating Deployments: Installing Packages
- Automating Deployments: 3+ Environments
- Architecture of a Deployment System
- Introducing Go Continuous Delivery
- Technology for automating deployments: the agony of choice
- Automating Deployments: New Website, Community
- Continuous Delivery for Libraries?
- Managing State in a Continuous Delivery Pipeline
- Automating Deployments: Building in the Pipeline
- Automating Deployments: Version Recycling Considered Harmful
- Automating Deployments: Stage 2: Uploading
- Automating Deployments: Installation in the Pipeline
- Automating Deployments: Pipeline Templates in GoCD
- Automatically Deploying Specific Versions
- Story Time: Rollbacks Saved the Day
- Automated Deployments: Unit Testing
- Automating Deployments: Smoke Testing and Rolling Upgrades
- Automating Deployments and Configuration Management
- Ansible: A Primer
- Continuous Delivery and Security
- Continuous Delivery on your Laptop
- Moritz on Continuous Discussions (#c9d9)
- Git Flow vs. Continuous Delivery
Sun, 09 Oct 2016
Git Flow vs. Continuous Delivery
Permanent link
I've often read the recommendation to use git flow as a branching model for software development projects, and I've even introduced it at some projects at work.
But when we adopted Continuous Delivery, it became pretty clear that git flow and Continuous Integration and Continuous Delivery don't mix well.
So you develop features and bug fixes in branches, and merge them into the develop branch. This means the develop branch needs to be the focus of your testing efforts, it needs to be automatically deployed to a testing environment and so on.
And then, git flow recommends that for going to production, you build packages from the master branch, and release them. The problem is that by building a new package or binary from the master branch, you invalidate all the testing you did in the develop branch.
Even if the code in the master branch is identical to that in the develop branch, you might get a different binary due to non-reproducible builds, changes in the versions of build tools and compilers, or even cosmic rays or other sources of random bit flips in RAM or on disk. And if you always get an identical binary, why bother to do a second build at all?
The spirit of Continuous Delivery is very much to test the heck out of one build artifact, and if it proves to be of high quality, bring it to production.
An Alternative: Trunk-Based Development
A workflow that fits better with Continuous Delivery is to do most development in the same branch. This branch is automatically tested and deployed to a testing environment, and if all the tests are successful, either deployed to production automatically, or after manual approval.
If there are features that you don't yet want your end users to see, you can hide them behind feature flags. Of course, feature flags come with their own complexity, and should be kept to a minimum.
Keeping your software releasable all the time is a core principle of Continuous Delivery, so if you practise that, and encounter a bug that needs an immediate fix, chances are high that you can apply the fix in the main development branch, and deploy it using the same automation that you use for your usual feature development.
If that doesn't work, you can always pause your deployment pipeline for the regular development branch, create a hotfix branch, and use the regular deployment code, but based on the hotfix branch, and bring your changes to your testing and production environments.
Does That Mean I Should Abandon Git Flow?
My experience is limited to pretty small development teams, and to certain kinds of software. For example, I've never developed software for embedded devices. So I certainly can't talk about all the different modes of operations.
My main point is that git flow doesn't mix well with Continuous Delivery, and that you shouldn't recommend it blindly without understanding the context in which it is used.
I'm writing a book on automating deployments. If this topic interests you, please sign up for the Automating Deployments newsletter. It will keep you informed about automating and continuous deployments. It also helps me to gauge interest in this project, and your feedback can shape the course it takes.
Thu, 11 Aug 2016
Moritz on Continuous Discussions (#c9d9)
Permanent link
On Tuesday I was a panelist on the Continuous Discussions Episode 47 – Open Source and DevOps. It was quite some fun!
Much of the discussion applied to Open Source in general software development, not just DevOps.
You can watch the full session on Youtube, or on the Electric Cloud blog.
I'm writing a book on automating deployments. If this topic interests you, please sign up for the Automating Deployments newsletter. It will keep you informed about automating and continuous deployments. It also helps me to gauge interest in this project, and your feedback can shape the course it takes.
Tue, 19 Jul 2016
Continuous Delivery on your Laptop
Permanent link
An automated deployment system, or delivery pipeline, builds software, and moves it through the various environments, like development, testing, staging, and production.
But what about testing and developing the delivery system itself? In which environment do you develop new features for the pipeline?
Start Small
When you are starting out you can likely get away with having just one environment for the delivery pipeline: the production environment.
It might shock you that you're supposed to develop anything in the production environment, but you should also be aware that the delivery system is not crucial for running your production applications, "just" for updating it. If the pipeline is down, your services still work. And you structure the pipeline to do the same jobs both in the testing and in the production environment, so you test the deployments in a test environment first.
A Testing Environment for the Delivery Pipeline?
If those arguments don't convince you, or you're at a point where developer productivity suffers immensely from an outage of the deployment system, you can consider creating a testing environment for the pipeline itself.
But pipelines in this testing environment should not be allowed to deploy to the actual production environment, and ideally shouldn't interfere with the application testing environment either. So you have to create at least a partial copy of your usual environments, just for testing the delivery pipeline.
This is only practical if you have automated basically all of the configuration and provisioning, and have access to some kind of cloud solution to provide you with the resources you need for this endeavour.
Creating a Playground
If you do decide that you do need some playground or testing environment for your delivery pipeline, there are a few options at your disposal. But before you build one, you should be aware of how many (or few) resources such an environment consumes.
Resource Usage of a Continuous Delivery Playground
For a minimal playground that builds a system similar to the one discussed in earlier blog posts, you need
- a machine on which you run the GoCD server
- a machine on which you run a GoCD agent
- a machine that acts as the testing environment
- a machine that acts as the production environment
You can run the GoCD server and agent on the same machine if you wish, which reduces the footprint to three machines.
The machine on which the GoCD server runs should have between one and two gigabytes of memory, and one or two (virtual) CPUs. The agent machine should have about half a GB of memory, and one CPU. If you run both server and agent on the same machine, two GB of RAM and two virtual CPUs should do nicely.
The specifications of the remaining two machines mostly depend on the type of applications you deploy and run on them. For the deployment itself you just need an SSH server running, which is very modest in terms of memory and CPU usage. If you stick to the example applications discussed in this blog series, or similarly lightweight applications, half a GB of RAM and a single CPU per machine should be sufficient. You might get away with less RAM.
So in summary, the minimal specs are:
- One VM with 2 GB RAM and 2 CPUs, for
go-serverandgo-agent - Two VMs with 0.5 GB RAM and 1 CPU each, for the "testing" and the "production" environments.
In the idle state, the GoCD server periodically polls the git repos, and the GoCD agent polls the server for work.
When you are not using the playground, you can shut off those processes, or even the whole machines.
Approaches to Virtualization
These days, almost nobody buys server hardware and runs such test machines directly on them. Instead there is usually a layer of virtualization involved, which both makes new operating system instances more readily available, and allows a denser resource utilization.
Private Cloud
If you work in a company that has its own private cloud, for example an OpenStack installation, you could use that to create a few virtual machines.
Public Cloud
Public cloud compute solutions, such as Amazon's EC2, Google's Compute Engine and Microsoft's Azure cloud offerings, allow you to create VM instances on demand, and be billed at an hourly rate. On all three services, you pay less than 0.10 USD per hour for an instance that can run the GoCD server[^pricedate].
[^pricedate]: Prices from July 2016, though I expect prices to only go downwards. Though resource usage of the software might increase in future as well.
Google Compute Engine even offers heavily discounted preemtible VMs. Those VMs are only available when the provider has excess resources, and come with the option to be shut down on relatively short notice (a few minutes). While this is generally not a good idea for an always-on production system, it can be a good fit for a cheap testing environment for a delivery pipeline.
Local Virtualization Solutions
If you have a somewhat decent workstation or laptop, you likely have sufficient resources to run some kind of virtualization software directly on it.
Instead of classical virtualization solutions, you could also use a containerization solution such as Docker, which provides enough isolation for testing a Continuous Delivery pipeline. The downside is that Docker is not meant for running several services in one container, and here you need at least an SSH server and the actual services that are being deployed. You could work around this by using Ansible's Docker connector instead of SSH, but then you make the testing playground quite dissimilar from the actual use case.
So let's go with a more typical virtualization environment such as KVM or VirtualBox, and Vagrant as a layer above them to automate the networking and initial provisioning. For more on this approach, see the next section.
Continuous Delivery on your Laptop
My development setup looks like this: I have the GoCD server installed on my Laptop running under Ubuntu, though running it under Windows or MacOS would certainly also work.
Then I have Vagrant installed, using the VirtualBox backend. I configure it to run three VMs for me: one for the GoCD agent, and one each as a testing and production machine. Finally there's an Ansible playbook that configures the three latter machines.
While running the Ansible playbook for configuring these three virtual machines requires internet connectivity, developing and testing the Continuous Delivery process does not.
If you want to use the same test setup, consider using the files from the
playground
directory
of the deployment-utils
repository, which will likely be
kept more up-to-date than this blog post.
Network and Vagrant Setup
We'll use Vagrant with a private network, which allows you to talk to each of the virtual machines from your laptop or workstation, and vice versa.
I've added these lines to my /etc/hosts file. This isn't strictly necessary,
but it makes it easier to talk to the VMs:
# Vagrant
172.28.128.1 go-server.local
172.28.128.3 testing.local
172.28.128.4 production.local
172.28.128.5 go-agent.local
And a few lines to my ~/.ssh/config file:
Host 172.28.128.* *.local
    User root
    StrictHostKeyChecking no
    IdentityFile /dev/null
    LogLevel ERROR
Do not do this for production machines. This is only safe on a virtual network on a single machine, where you can be sure that no attacker is present, unless they already compromised your machine.
That said, creating and destroying VMs is common in Vagrant land, and each time you create them anew, the will have new host keys. Without such a configuration, you'd spend a lot of time updating SSH key fingerprints.
Then let's get Vagrant:
$ apt-get install -y vagrant virtualbox
To configure Vagrant, you need a Ruby script called Vagrantfile:
# -*- mode: ruby -*-
# vi: set ft=ruby :

Vagrant.configure(2) do |config|
  config.vm.box = "debian/contrib-jessie64"

  {
    'testing'    => "172.28.128.3",
    'production' => "172.28.128.4",
    'go-agent'   => "172.28.128.5",
  }.each do |name, ip|
    config.vm.define name do |instance|
        instance.vm.network "private_network", ip: ip
        instance.vm.hostname = name + '.local'
    end
  end

  config.vm.synced_folder '/datadisk/git', '/datadisk/git'

  config.vm.provision "shell" do |s|
    ssh_pub_key = File.readlines("#{Dir.home}/.ssh/id_rsa.pub").first.strip
    s.inline = <<-SHELL
      mkdir -p /root/.ssh
      echo #{ssh_pub_key} >> /root/.ssh/authorized_keys
    SHELL
  end
end
This builds three Vagrant VMs based on the debian/contrib-jessie64 box,
which is mostly a pristine Debian Jessie VM, but also includes a file system
driver that allows Vagrant to make directories from the host system available
to the guest system.
I have a local directory /datadisk/git in which I keep a mirror of my git
repositories, so that both the GoCD server and agent can access the git
repositories without requiring internet access, and without needing another
layer of authentication. The config.vm.synced_folder call in the Vagrant
file above replicates this folder into the guest machines.
Finally the code reads an SSH public key from the file ~/.ssh/config and
adds it to the root account on the guest machines. In the next step, an
Ansible playbook will use this access to configure the VMs to make them ready
for the delivery pipeline.
To spin up the VMs, type
$ vagrant up
in the folder containing the Vagrantfile. The first time you run this, it
takes a bit longer because Vagrant needs to download the base image first.
Once that's finished, you can call the command vagrant status to see if
everything works, it should look like this:
$ vagrant status
Current machine states:

testing                   running (virtualbox)
production                running (virtualbox)
go-agent                  running (virtualbox)

This environment represents multiple VMs. The VMs are all listed
above with their current state. For more information about a specific
VM, run `vagrant status NAME`.
And (on Debian-based Linux systems) you should be able to see the newly created, private network:
$ ip route | grep vboxnet
172.28.128.0/24 dev vboxnet1  proto kernel  scope link  src 172.28.128.1
You should now be able to log in to the VMs with ssh root@go-agent.local, and
the same with testing.local and production.local as host names.
Ansible Configuration for the VMs
It's time to configure the Vagrant VMs. Here's an Ansible playbook that does this:
---
 - hosts: go-agent
   vars:
     go_server: 172.28.128.1
   tasks:
   - group: name=go system=yes
   - name: Make sure the go user has an SSH key
     user: name=go system=yes group=go generate_ssh_key=yes home=/var/go
   - name: Fetch the ssh public key, so we can later distribute it.
     fetch: src=/var/go/.ssh/id_rsa.pub dest=go-rsa.pub fail_on_missing=yes flat=yes
   - apt: package=apt-transport-https state=installed
   - apt_key: url=https://download.gocd.io/GOCD-GPG-KEY.asc state=present validate_certs=no
   - apt_repository: repo='deb https://download.gocd.io /' state=present
   - apt: update_cache=yes package={{item}} state=installed
     with_items:
      - go-agent
      - git

   - copy:
       src: files/guid.txt
       dest: /var/lib/go-agent/config/guid.txt
       owner: go
       group: go
   - lineinfile: dest=/etc/default/go-agent regexp=^GO_SERVER= line=GO_SERVER={{ go_server }}
   - service: name=go-agent enabled=yes state=started

 - hosts: aptly
   handlers:
    - name: restart lighttpd
      service: name=lighttpd state=restarted
   tasks:
     - apt: package={{item}} state=installed
       with_items:
        - ansible
        - aptly
        - build-essential
        - curl
        - devscripts
        - dh-systemd
        - dh-virtualenv
        - gnupg2
        - libjson-perl
        - python-setuptools
        - lighttpd
        - rng-tools
     - copy: src=files/key-control-file dest=/var/go/key-control-file
     - command: killall rngd
       ignore_errors: yes
       changed_when: False
     - command: rngd -r /dev/urandom
       changed_when: False
     - command: gpg --gen-key --batch /var/go/key-control-file
       args:
         creates: /var/go/.gnupg/pubring.gpg
       become_user: go
       become: true
       changed_when: False
     - shell: gpg --export --armor > /var/go/pubring.asc
       args:
         creates: /var/go/pubring.asc
       become_user: go
       become: true
     - fetch:
         src: /var/go/pubring.asc
         dest: =deb-key.asc
         fail_on_missing: yes
         flat: yes
     - name: Bootstrap the aptly repos that will be configured on the `target` machines
       copy:
        src: ../add-package
        dest: /usr/local/bin/add-package
        mode: 0755
     - name: Download an example package to fill the repo with
       get_url:
        url: http://ftp.de.debian.org/debian/pool/main/b/bash/bash_4.3-11+b1_amd64.deb
        dest: /tmp/bash_4.3-11+b1_amd64.deb
     - command: /usr/local/bin/add-package {{item}} jessie /tmp/bash_4.3-11+b1_amd64.deb
       args:
           creates: /var/go/aptly/{{ item }}-jessie.conf
       with_items:
         - testing
         - production
       become_user: go
       become: true

     - name: Configure lighttpd to serve the aptly directories
       copy: src=files/lighttpd.conf dest=/etc/lighttpd/conf-enabled/30-aptly.conf
       notify:
         - restart lighttpd
     - service: name=lighttpd state=started enabled=yes

 - hosts: target
   tasks:
     - authorized_key:
        user: root
        key: "{{ lookup('file', 'go-rsa.pub') }}"
     - apt_key: data="{{ lookup('file', 'deb-key.asc') }}" state=present

 - hosts: production
   tasks:
     - apt_repository:
         repo: "deb http://{{hostvars['agent.local']['ansible_ssh_host'] }}/debian/production/jessie jessie main"
         state: present

 - hosts: testing
   tasks:
     - apt_repository:
         repo: "deb http://{{hostvars['agent.local']['ansible_ssh_host'] }}/debian/testing/jessie jessie main"
         state: present

 - hosts: go-agent
   tasks:
     - name: 'Checking SSH connectivity to {{item}}'
       become: True
       become_user: go
       command: ssh -o StrictHostkeyChecking=No root@"{{ hostvars[item]['ansible_ssh_host'] }}" true
       changed_when: false
       with_items: groups['target']
You also need a hosts or inventory file:
[all:vars]
ansible_ssh_user=root

[go-agent]
agent.local ansible_ssh_host=172.28.128.5

[aptly]
agent.local

[target]
testing.local ansible_ssh_host=172.28.128.3
production.local ansible_ssh_host=172.28.128.4

[testing]
testing.local

[production]
production.local
... and a small ansible.cfg file:
[defaults]
host_key_checking = False
inventory = hosts
pipelining=True
This does a whole lot of stuff:
- Install and configure the GoCD agent
- copies a file with a fixed UID to the configuration directory
of the
go-agent, so that when you tear down the machine and create it anew, the GoCD server will identify it as the same agent as before.
- copies a file with a fixed UID to the configuration directory
of the
- Gives the
gouser on thego-agentmachine SSH access on the target hosts by- first making sure the
gouser has an SSH key - copying the public SSH key to the host machine
- later distributing it to the target machine using the
authorized_keymodule
- first making sure the
- Creates a GPG key pair for the
gouser- since GPG key creation uses lots of entropy for random numbers, and
VMs typically don't have that much entropy, first install
rng-toolsand use that to convince the system to use lower-quality randomness. Again, this is something you shouldn't do on a production setting.
- since GPG key creation uses lots of entropy for random numbers, and
VMs typically don't have that much entropy, first install
- Copies the public key of said GPG key pair to the host machine, and
then distribute it to the target machines using the
apt_keymodule - Creates some
aptly-based Debian repositories on thego-agentmachine by- copying the
add-packagescript from the same repository to thego-agentmachine - running it with a dummy package, here
bash, to actually create the repos - installing and configuring
lighttpdto serve these packages by HTTP - configuring the
targetmachines to use these repositories as a package source
- copying the
- Checks that the
gouser on thego-agentmachine can indeed reach the other VMs via SSH
After running ansible-playbook setup.yml, your local GoCD server should
have a new agent, which you have to activate in the web configuration and
assign the appropriate resources (debian-jessie and aptly if you follow
the examples from this blog series).
Now when you clone your git repos to /datadisk/git/ (be sure to git clone
--mirror) and configure the pipelines on the GoCD server, you have a complete
Continuous Delivery-system running on one physical machine.
I'm writing a book on automating deployments. If this topic interests you, please sign up for the Automating Deployments newsletter. It will keep you informed about automating and continuous deployments. It also helps me to gauge interest in this project, and your feedback can shape the course it takes.
Tue, 12 Jul 2016
Continuous Delivery and Security
Permanent link
What's the impact of automated deployment on the security of your applications and infrastructure?
It turns out there are both security advantages, and things to be wary of.
The Dangers of Centralization
In a deployment pipeline, the machine that controls the deployment needs to have access to the target machines where the software is deployed.
In the simplest case, there is private SSH key on the deployment machine, and the target machines grant access to the owner of that key.
This is an obvious risk, since an attacker gaining access to the deployment machine (or in the examples discussed previously, the GoCD server controlling the machine) can use this key to connect to all of the target machines.
Some possible mitigations include:
- hardened setup of the deployment machine
- password-protect the SSH key and supply the password through the same channel that triggers the deployment
- have separate deployment and build hosts. Build hosts tend to need far more software installed, which imply a bigger attack surface
- on the target machines, only allow unprivileged access through said SSH
key, and use something like
sudoto allow only certain privileged operations
Each of these mitigations have their own costs and weaknesses. For example password-protecting SSH keys helps if the attacker only manages to obtain a copy of the file system, but not if the attacker gains root privileges on the machine, and thus can obtain a memory dump that includes the decrypted SSH key.
The sudo approach is very effective at limiting the spread of an attack, but it requires extensive configuration on the target machine, and you need a secure way to deploy that. So you run into a chicken-and-egg problem and have quite some extra effort.
On the flip side, if you don't have a delivery pipeline, deployments have to happen manually, so you have the same problem of needing to give humans access to the target machines. Most organizations offer some kind of secured host on which the operator's SSH keys are stored, and you face the same risk with that host as the deployment host.
Time to Market for Security Fixes
Compared to manual deployments, even a relatively slow deployment pipeline is still quite fast. When a vulnerability is identified, this quick and automated rollout process can make a big difference in reducing the time until the fix is deployed.
Equally important is the fact that a clunky manual release process seduces the operators into taking shortcuts around security fixes, skipping some steps of the quality assurance process. When that process is automated and fast, it is easier to adhere to the process than to skip it, so it will actually be carried out even in stressful situations.
Audits and Software Bill of Materials
A good deployment pipeline tracks when which version of a software was built and deployed. This allows one to answer questions such as "For how long did we have this security hole?", "How soon after the report was the vulnerability patched in production?" and maybe even "Who approved the change that introduced the vulnerability?".
If you also use configuration management based on files that are stored in a version control system, you can answer these questions even for configuration, not just for software versions.
In short, the deployment pipeline provides enough data for an audit.
Some legislations require you to record a Software Bill of Materials. This is a record of which components are contained in some software, for example a list of libraries and their versions. While this is important for assessing the impact of a license violation, it is also important for figuring out which applications are affected by a vulnerability in a particular version of a library.
For example, a 2015 report by HP Security found that 44% of the investigated breaches were made possible by vulnerabilities that have been known (and presumably patched) for at least two years. Which in turn means that you can nearly halve your security risk by tracking which software version you use where, subscribe to a newsletter or feed of known vulnerabilities, and rebuild and redeploy your software with patched versions.
A Continuous Delivery system doesn't automatically create such a Software Bill of Materials for you, but it gives you a place where you can plug in a system that does for you.
Conclusions
Continuous Delivery gives the ability to react quickly and predictably to newly discovered vulnerabilities. At the same time, the deployment pipeline itself is an attack surface, which, if not properly secured, can be quite an attractive target for an intruder.
Finally, the deployment pipeline can help you to collect data that can give insight into the usage of software with known vulnerabilities, allowing you to be thorough when patching these security holes.
I'm writing a book on automating deployments. If this topic interests you, please sign up for the Automating Deployments newsletter. It will keep you informed about automating and continuous deployments. It also helps me to gauge interest in this project, and your feedback can shape the course it takes.
Tue, 05 Jul 2016
Ansible: A Primer
Permanent link
Ansible is a very pragmatic and powerful configuration management system that is easy to get started with.
Connections and Inventory
Ansible is typically used to connect to one or more remote hosts
via ssh and bring them into a desired state. The connection method is
pluggable: other methods include local, which simply invokes the commands on
the local host instead, and docker, which connects through the Docker daemon
to configure a running container.
To tell Ansible where and how to connect, you write an inventory file,
called hosts by default. In the inventory file, you can define hosts and
groups of hosts, and also set variables that control how to connect to them.
# file myinventory
# example inventory file
[all:vars]
# variables set here apply to all hosts
ansible_user=root

[web]
# a group of webservers
www01.example.com
www02.example.com

[app]
# a group of 5 application servers,
# all following the same naming scheme:
app[01:05].example.com

[frontend:children]
# a group that combines the two previous groups
app
web

[database]
# here we override ansible_user for just one host
db01.example.com ansible_user=postgres
(In versions prior to Ansible 2.0, you have to use ansible_ssh_user instead
of ansible_user). See the introduction to inventory
files for more
information.
To test the connection, you can use the ping module on the command line:
$ ansible -i myinventory web -m ping
www01.example.com | success >> {
    "changed": false,
    "ping": "pong"
}

www02.example.com | success >> {
    "changed": false,
    "ping": "pong"
}
Let's break the command line down into its components: -i myinventory
tells Ansible to use the myinventory file as inventory. web tells
Ansible which hosts to work on. It can be a group, as in this example, or a
single host, or several such things separated by a colon. For example,
www01.example.com:database would select one of the web servers and all of
the database servers. Finally, -m ping tells Ansible which module to
execute. ping is probably the simplest module, it simply sends the
response "pong" and that the remote host hasn't changed.
These commands run in parallel on the different hosts, so the order in which these responses are printed can vary.
If there is a problem with connecting to a host, add the option -vvv to get
more output.
Ansible implicitly gives you the group all which -- you guessed it --
contains all the hosts configured in the inventory file.
Modules
Whenever you want to do something on a host through Ansible, you invoke a module to do that. Modules usually take arguments that specify what exactly should happen. On the command line, you can add those arguments with `ansible -m module -a 'arguments', for example
$ ansible -i myinventory database -m shell -a 'echo "hi there"'
db01.exapmle.com | success | rc=0 >>
hi there
Ansible comes with a wealth of built-in modules and an ecosystem of third-party modules as well. Here I want to present just a few, commonly-used modules.
The shell Module
The shell module
executes a shell command on the host and accepts some options such as chdir
to change into another working directory first:
$ ansible -i myinventory database -m shell -e 'pwd chdir=/tmp'
db01.exapmle.com | success | rc=0 >>
/tmp
It is pretty generic, but also an option of last resort. If there is a more
specific module for the task at hand, you should prefer the more specific
module. For example you could ensure that system users exist using the shell
module, but the more specialized user
module is much easier to
use for that, and likely does a better job than an improvised shell script.
The copy Module
With copy you can
copy files verbatim from the local to the remote machine:
$ ansible -i myinventory database -m copy -a 'src=README.md dest=/etc/motd mode=644
db01.example.com | success >> {
    "changed": true,
    "dest": "/etc/motd",
    "gid": 0,
    "group": "root",
    "md5sum": "d41d8cd98f00b204e9800998ecf8427e",
    "mode": "0644",
    "owner": "root",
    "size": 0,
    "src": "/root/.ansible/tmp/ansible-tmp-1467144445.16-156283272674661/source",
    "state": "file",
    "uid": 0
}
The template Module
template mostly
works like copy, but it interprets the source file as a Jinja2
template before transferring it to the
remote host.
This is commonly used to create configuration files and to incorporate information from variables (more on that later).
Templates cannot be used directly from the command line, but rather in playbooks, so here is an example of a simple playbook.
# file motd.j2
This machine is managed by {{team}}.


# file template-example.yml
---
- hosts: all
  vars:
    team: Slackers
  tasks:
   - template: src=motd.j2 dest=/etc/motd mode=0644
More on playbooks later, but what you can see is that this defines a variable
team, sets it to the value Slacker, and the template interpolates this
variable.
When you run the playbook with
$ ansible-playbook -i myinventory --limit database template-example.yml
It creates a file /etc/motd on the database server with the contents
This machine is manged by Slackers.
The file Module
The file module manages
attributes of file names, such as permissions, but also allows you create
directories, soft and hard links.
$ ansible -i myinventory database -m file -a 'path=/etc/apt/sources.list.d state=directory mode=0755'
db01.example.com | success >> {
    "changed": false,
    "gid": 0,
    "group": "root",
    "mode": "0755",
    "owner": "root",
    "path": "/etc/apt/sources.list.d",
    "size": 4096,
    "state": "directory",
    "uid": 0
}
The apt Module
On Debian and derived distributions, such as Ubuntu, installing and removing
packages is generally done with package managers from the apt family, such
as apt-get, aptitude, and in newer versions, the apt binary directly.
The apt module manages this from within Ansible:
$ ansible -i myinventory database -m apt -a 'name=screen state=installed update_cache=yes'
db01.example.com | success >> {
    "changed": false
}
Here the screen package was already installed, so the module didn't change
the state of the system.
Separate modules are available for managing apt-keys with which repositories are cryptographically verified, and for managing the repositories themselves.
The yum and zypper Modules
For RPM-based Linux distributions, the yum module (core) and zypper module (not in core, so must be installed separately) are available. They manage package installation via the package managers of the same name.
The package Module
The package module
tries to use whatever package manager it detects. It is thus more generic than
the apt and yum modules, but supports far fewer features. For example in
the case of apt, it does not provide any control over whether to run apt-get
update before doing anything else.
Application-Specific Modules
The modules presented so far are fairly close to the system, but there are also modules for achieving common, application specific tasks. Examples include dealing with databases, network related things such as proxies, version control systems, clustering solutions such as Kubernetes, and so on.
Playbooks
Playbooks can contain multiple calls to modules in a defined order and limit their execution to individual or group of hosts.
They are written in the YAML file format, a data serialization file format that is optimized for human readability.
Here is an example playbook that installs the newest version of the go-agent
Debian package, the worker for Go Continuous Delivery:
---
- hosts: go-agent
  vars:
    go_server: hack.p6c.org
  tasks:
  - apt: package=apt-transport-https state=installed
  - apt_key: url=https://download.gocd.io/GOCD-GPG-KEY.asc state=present validate_certs=no
  - apt_repository: repo='deb https://download.gocd.io /' state=present
  - apt: update_cache=yes package={{item}} state=installed
    with_items:
     - go-agent
     - git
     - build-essential
  - lineinfile: dest=/etc/default/go-agent regexp=^GO_SERVER= line=GO_SERVER={{ go_server }}
  - service: name=go-agent enabled=yes state=started
The top level element in this file is a one-element list. The single element
starts with hosts: go-agent, which limits execution to hosts in the group
go-agent. This is the relevant part of the inventory file that goes with it:
[go-agent]
go-worker01.p6c.org
go-worker02.p6c.org
Then it sets the variable go_server to a string, here this is the hostname
where a GoCD server runs.
Finally, the meat of the playbook: the list of tasks to execute.
Each task is a call to a module, some of which have already been discussed. A quick overview:
- First, the Debian package
apt-transport-httpsis installed, to make sure that the system can fetch meta data and files from Debian repositories through HTTPS - The next two tasks use the
apt_repository
and apt_key modules
to configure the repository from which the actual
go-agentpackage shall be installed - Another call to
aptinstalls the desired package. Also, some more packages are installed with a loop construct - The lineinfile module searches by regex for a line in a text file, and replaces the appropriat line with pre-defined content. Here we use that to configure the GoCD server that the agent connects to.
- Finally, the service
module starts the agent if it's not yet running (
state=started), and ensures that it is automatically started on reboot (enabled=yes).
Playbooks are invoked with the ansible-playbook command.
There can be more than one list of tasks in a playbook, which is a common use-case when they affect different groups of hosts:
---
- hosts: go-agent:go-server
  tasks:
  - apt: package=apt-transport-https state=installed
  - apt_key: url=https://download.gocd.io/GOCD-GPG-KEY.asc state=present validate_certs=no
  - apt_repository: repo='deb https://download.gocd.io /' state=present

- hosts: go-agent
  - apt: update_cache=yes package={{item}} state=installed
    with_items:
     - go-agent
     - git
     - build-essential
   - ...

- hosts: go-server
  - apt: update_cache=yes package=go-server state=installed
  - ...
Variables
Variables are useful both for controlling flow inside a playbook, and for filling out spots in templates to generate configuration files.
There are several ways to set variables. One is directly in playbooks, via
vars: ..., as seen before. Another is to specify them at the command line:
ansible-playbook --extra-vars=variable=value theplaybook.yml
Another, very flexible way is to use the group_vars feature. For each group
that a host is in, Ansible looks for a file group_vars/thegroup.yml and
for files matching `group_vars/thegroup/*.yml. A host can be in several
groups at once, which gives you quite some flexibility.
For example, you can put each host into two groups, one for the role the host is playing (like webserver, database server, DNS server etc.), and one for the environment it is in (test, staging, prod). Here is a small example that uses this layout:
# environments
[prod]
www[01:02].example.com
db01.example.com

[test]
db01.test.example.com
www01.test.example.com


# functional roles
[web]
www[01:02].example.com
www01.test.example.com

[db]
db01.example.com
db01.test.example.com
To roll out only the test hosts, you can run
ansible-playbook --limit test theplaybook.yml
and put environment-specific variables in group_vars/test.yml and
group_vars/prod.yml, and web server specific variables in
group_vars/web.yml etc.
You can use nested data structures in your variables, and if you do, you can
configure Ansible to merge those data structures for you. You can configure it
by creating a file called ansible.cfg with this content:
[defaults]
hash_behavior=merge
That way, you can have a file group_vars/all.yml that sets the default
values:
# file group_vars/all.yml
myapp:
    domain: example.com
    db:
        host: db.example.com
        username: myappuser
        instance. myapp
And then override individual elements of that nested data structure, for
example in group_vars/test.yml:
# file group_vars/test.yml
myapp:
    domain: text.example.com
    db:
        hostname: db.test.example.com
The keys that the test group vars file didn't touch, for example
myapp.db.username, are inherited from the file all.yml.
Roles
Roles are a way to encapsulate parts of a playbook into a reusable component.
Let's consider a real world example that leads to a simple role definition.
For deploying software, you always want to deploy the exact version you want to build, so the relevant part of the playbook is
- apt: name=thepackage={{package_version}} state=present update_cache=yes force=yes
But this requires you to supply the package_version variable whenever you
run the playbook, which will not be practical when you instead configure a new
machine and need to install several software packages, each with their own
playbook.
Hence, we generalize the code to deal with the case that the version number is absent:
- apt: name=thepackage={{package_version}} state=present update_cache=yes force=yes
  when: package_version is defined
- apt: name=thepackage state=present update_cache=yes
  when: package_version is undefined
If you run several such playbooks on the same host, you'll notice that it
likely spends most of its time running apt-get update for each playbook. This
is necessary the first time, because you might have just uploaded a new
package on your local Debian mirror prior to the deployment, but subsequent
runs are unnecessary. So you can store the information that a host has already
updated its cache in a fact,
which is a per-host kind of variable in Ansible.
- apt: update_cache=yes
  when: apt_cache_updated is undefined

- set_fact:
    apt_cache_updated: true
As you can see, the code base for sensibly installing a package has grown a bit, and it's time to factor it out into a role.
Roles are collections of YAML files, with pre-defined names. The commands
$ mkdir roles
$ cd roles
$ ansible-galaxy init custom_package_installation
create an empty skeleton for a role named custom_package_installation.
The tasks that previously went into all the playbooks now go into the file
tasks/main.yml below the role's main directory:
# file roles/custom_package_installation/tasks/main.yml
- apt: update_cache=yes
  when: apt_cache_updated is undefined
- set_fact:
    apt_cache_updated: true

- apt: name={{package}={{package_version}} state=present update_cache=yes force=yes
  when: package_version is defined
- apt: name={{package} state=present update_cache=yes
  when: package_version is undefined
To use the role, first add the line roles_path = roles in the file
ansible.cfg in the [default] section, and then in a playbook, include it
like this:
---
- hosts: web
  pre_tasks:
     - # tasks that are execute before the role(s)
  roles: { role: custom_package_installation, package: python-matheval }
  tasks:
    - # tasks that are executed after the role(s)
pre_tasks and tasks are optional; a playbook consisting of only roles
being included is totally fine.
Summary
Ansible offers a pragmatic approach to configuration management, and is easy to get started with.
It offers modules for low-level tasks such as transferring files and executing shell commands, but also higher-level task like managing packages and system users, and even application-specific tasks such as managing PostgreSQL and MySQL users.
Playbooks can contain multiple calls to modules, and also use and set variables and consume roles.
Ansible has many more features, like handlers, which allow you to restart services only once after any changes, dynamic inventories for more flexible server landscapes, vault for encrypting variables, and a rich ecosystem of existing roles for managing common applications and middleware.
For learning more about Ansible, I highly recommend the excellent book Ansible: Up and Running by Lorin Hochstein.
I'm writing a book on automating deployments. If this topic interests you, please sign up for the Automating Deployments newsletter. It will keep you informed about automating and continuous deployments. It also helps me to gauge interest in this project, and your feedback can shape the course it takes.
Tue, 28 Jun 2016
Automating Deployments and Configuration Management
Permanent link
New software versions often need new configuration as well. How do you make sure that the necessary configuration arrives on a target machine at the same time (or before) the software release that introduces them?
The obvious approach is to put the configuration in version control too and deploy it alongside the software.
Taking configuration from a source repository and applying it to running machines is what configuration management software does.
Since Ansible has been used for deployment in the examples so far -- and it's a good configuration management system as well -- it is an obvious choice to use here.
Benefits of Configuration Management
When your infrastructure scales to many machines, and you don't want your time and effort to scale linearly with them, you need to automate things. Keeping configuration consistent across different machines is a requirement, and configuration management software helps you achieve that.
Furthermore, once the configuration comes from a canonical source with version control, tracking and rolling back configuration changes becomes trivial. If there is an outage, you don't need to ask all potentially relevant colleagues whether they changed anything -- your version control system can easily tell you. And if you suspect that a recent change caused the outage, reverting it to see if the revert works is a matter of seconds or minutes.
Once configuration and deployment are automated, building new environments, for example for penetration testing, becomes a much more manageable task.
Capabilities of a Configuration Management System
Typical tasks and capabilities of configuration management software include things like connecting to the remote host, copying files to the host (and often adjusting parameters and filling out templates in the process), ensuring that operating system packages are installed or absent, creating users and groups, controlling services, and even executing arbitrary commands on the remote host.
With Ansible, the connection to the remote host is provided by the core, and
the actual steps to be executed are provided by modules. For example the
apt_repository module can be used to manage repository configuration (i.e.
files in /etc/apt/sources.list.d/), the apt module installs, upgrades,
downgrades or removes packages, and the template module typically generates
configuration files from variables that the user defined, and from facts that
Ansible itself gathered.
There are also higher-level Ansible modules available, for example for managing Docker images, or load balancers from the Amazon cloud.
A complete introduction to Ansible is out of scope here, but I can recommend the online documentation, as well as the excellent book Ansible: Up and Running by Lorin Hochstein.
To get a feeling for what you can do with Ansible, see the ansible-examples git repository.
Assuming that you will find your way around configuration management with Ansible through other resources, I want to talk about how you can integrate it into the deployment pipeline instead.
Integrating Configuration Management with Continuous Delivery
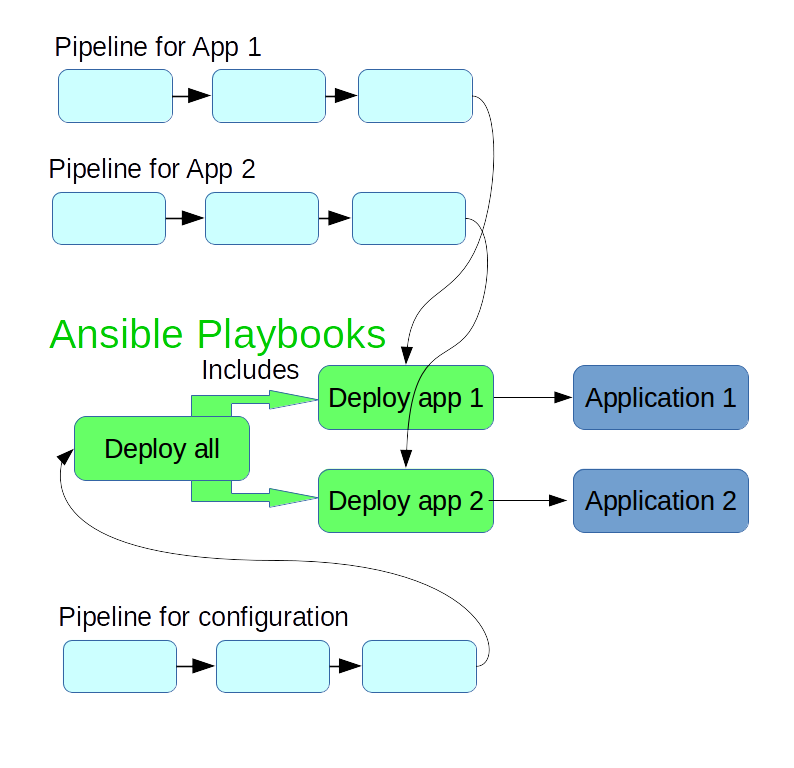
The previous approach of writing one deployment playbook for each application can serve as a starting point for configuration management. You can simply add more tasks to the playbook, for example for creating the configuration files that the application needs. Then each deployment automatically ensures the correct configuration.
Since most modules in Ansible are idempotent, that is, repeated execution doesn't change the state of the system after the first time, adding additional tasks to the deployment playbook only becomes problematic when performance suffers. If that happens, you could start to extract some slow steps out into a separate playbook that doesn't run on each deployment.
If you provision and configure a new machine, you typically don't want
to manually trigger the deploy step of each application, but rather have a
single command that deploys and configures all of the relevant applications
for that machine. So it makes sense to also have a playbook for deploying all
relevant applications. This can be as simple as a list of include statements
that pull in the individual application's playbooks.
You can add another pipeline that applies this "global" configuration to the testing environment, and after manual approval, in the production environment as well.
Stampedes and Synchronization
In the scenario outlined above, the configuration for all related applications lives in the same git repository, and is used a material in the build and deployment pipelines for all these applications.
A new commit in the configuration repository then triggers a rebuild of all the applications. For a small number of applications, that's usually not a problem, but if you have a dozen or a few dozen applications, this starts to suck up resources unnecessarily, and also means no build workers are available for some time to build changes triggered by actual code changes.
To avoid these build stampedes, a pragmatic approach is to use ignore filters in the git materials. Ignore filters are typically used to avoid rebuilds when only documentation changes, but can also be used to prevent any changes in a repository to trigger a rebuild.
If, in the <materials> section of your GoCD pipeline, you replace
<git url="https://github.com/moritz/deployment-utils.git" dest="deployment-utils" materialName="deployment-utils" />
With
<git url="https://github.com/moritz/deployment-utils.git" dest="deployment-utils" materialName="deployment-utils">
  <filter>
    <ignore pattern="**/*" />
    <ignore pattern="*" />
  </filter>
</git>
then a newly pushed commit to the deployment-utils repo won't trigger this
pipeline. A new build, triggered either manually or from a new commit in the
application's git repository, still picks up the newest version of the
deployment-utils repository.
In the pipeline that deploys all of the configuration, you wouldn't add such a filter.
Now if you change some playbooks, the pipeline for the global configuration runs and rolls out these changes, and you promote the newest version to production. When you then deploy one of your applications to production, and the build happened before the changes to the playbook, it actually uses an older version of the playbook.
This sounds like a very unfortunate constellation, but it turns out not to be so bad. The combination of playbook version and application version worked in testing, so it should work in production as well.
To avoid using an older playbook, you can trigger a rebuild of the application, which automatically uses the newest playbook version.
Finally, in practice it is a good idea to bring most changes to production pretty quickly anyway. If you don't do that, you lose overview of what changed, which leads to growing uncertainty about whether a production release is safe. If you follow this ideal of going quickly to production, the version mismatches between the configuration and application pipelines should never become big enough to worry about.
Conclusion
The deployment playbooks that you write for your applications can be extended to do full configuration management for these applications. You can create a "global" Ansible playbook that includes those deployment playbooks, and possibly other configuration, such as basic configuration of the system.
I'm writing a book on automating deployments. If this topic interests you, please sign up for the Automating Deployments newsletter. It will keep you informed about automating and continuous deployments. It also helps me to gauge interest in this project, and your feedback can shape the course it takes.
Tue, 21 Jun 2016
Automating Deployments: Smoke Testing and Rolling Upgrades
Permanent link
In the last installment I talked about unit testing that covers the logic of your application. Unit testing is a good and efficient way to ensure the quality of the business logic, however unit tests tend to test components in isolation.
You should also check that several components work together well, which can be done with integration tests or smoke tests. The distinction between these two is a bit murky at times, but typically integration tests are still done somewhat in isolation, whereas smoke tests are run against an installed copy of the software in a complete environment, with all external services available.
A smoke test thus goes through the whole software stack. For a web application, that typically entails a web server, an application server, a database, and possibly integration points with other services such as single sign-on (SSO) or external data sources.
When to Smoke?
Smoke tests cover a lot of ground at once. A single test might require a working network, correctly configured firewall, web server, application server, database, and so on to work. This is an advantage, because it means that it can detect a big class of errors, but it is also a disadvantage, because it means the diagnostic capabilities are low. When it fails, you don't know which component is to blame, and have to investigate each failure anew.
Smoke tests are also much more expensive than unit tests; they tend to take more time to write, take longer to execute, and are more fragile in the face of configuration or data changes.
So typical advice is to have a low number of smoke tests, maybe one to 20, or maybe around one percent of the unit tests you have.
As an example, if you were to develop a flight search and recommendation engine for the web, your unit tests would cover different scenarios that the user might encounter, and that the engine produces the best possible suggestions. In smoke tests, you would just check that you can enter the starting point, destination and date of travel, and that you get a list of flight suggestions at all. If there is a membership area on that website, you would test that you cannot access it without credentials, and that you can access it after logging in. So, three smoke tests, give or take.
White Box Smoke Testing
The examples mentioned above are basically black-box smoke testing, in that they don't care about the internals of the application, and approach the application just like a user. This is very valuable, because ultimately you care about your user's experience.
But sometimes some aspects of the application aren't easy to smoke test, yet break often enough to warrant automated smoke tests. A practical solution is to offer some kind of self diagnosis, for example a web page where the application tests its own configuration for consistency, checks that all the necessary database tables exist, and that external services are reachable.
Then a single smoke test can call the status page, and throw an error whenever either the status page is not reachable, or reports an error. This is a white box smoke test.
Status pages for white box smoke tests can be reused in monitoring checks, but it is still a good idea to explicitly check it as part of the deployment process.
White box smoke testing should not replace black box smoke testing, but rather complement it.
An Example Smoke Test
The matheval application from the previous blog post offers a simple HTTP endpoint, so any HTTP client will do for smoke testing.
Using the curl command line HTTP client, a possible request looks like this:
$ curl  --silent -H "Accept: application/json" --data '["+", 37, 5]' -XPOST  http://127.0.0.1:8800/
42
An easy way to check that the output matches expectations is by piping it through grep:
$ curl  --silent -H "Accept: application/json" --data '["+", 37, 5]' -XPOST  http://127.0.0.1:8800/ | grep ^42$
42
The output is the same as before, but the exit status is non-zero if the output deviates from the expectation.
Integration the Smoke Testing Into the Pipeline
One could add a smoke test stage after each deployment stage (that is, one after the test deployment, one after the production deployment).
This setup would prevent a version of your application from reaching the production environment if it failed smoke tests in the testing environment. Since the smoke test is just a shell command that indicates failure with a non-zero exit status, adding it as a command in your deployment system should be trivial.
If you have just one instance of your application running, this is the best you can do. But if you have a farm of servers, and several instances of the application running behind some kind of load balancer, it is possible to smoke test each instance separately during an upgrade, and abort the upgrade if too many instances fail the smoke test.
All big, successful tech companies guard their production systems with such partial upgrades guarded by checks, or even more elaborate versions thereof.
A simple approach to such a rolling upgrade is to write an ansible playbook for the deployment of each package, and have it run the smoke tests for each machine before moving to the next:
# file smoke-tests/python-matheval
#!/bin/bash
curl  --silent -H "Accept: application/json" --data '["+", 37, 5]' -XPOST  http://$1:8800/ | grep ^42$


# file ansible/deploy-python-matheval.yml
---
- hosts: web
  serial: 1
  max_fail_percentage: 1
  tasks:
    - apt: update_cache=yes package=python-matheval={{package_version}} state=present force=yes
    - local_action: command ../smoke-tests/python-matheval "{{ansible_host}}"
      changed_when: False
As the smoke tests grow over time, it is not practical to cram them all into the ansible playbook, and doing that also limits reusability. Instead here they are in a separate file in the deployments utils repository. Another option would be to build a package from the smoke tests and install them on the machine that ansible runs on.
While it would be easy to execute the smoke tests command on the machine on which the service is installed, running it as a local action (that is, on the control host where the ansible playbook is started) also tests the network and firewall part, and thus more realistically mimics the actual usage scenario.
GoCD Configuration
To run the new deployment playbook from within the GoCD pipeline, change the testing deployment job in the template to:
<tasks>
<fetchartifact pipeline="" stage="build" job="build-deb" srcfile="version" />
<exec command="/bin/bash" workingdir="deployment-utils/ansible/">
<arg>-c</arg>
<arg>ansible-playbook --inventory-file=testing --extra-vars=package_version=$(< ../../version) #{deploy_playbook}</arg>
</exec>
</tasks>
And the same for production, except that it uses the production inventory
file. This change to the template also changes the parameters that need to be
defined in the pipeline definition. In the python-matheval example it becomes
  <params>
    <param name="distribution">jessie</param>
    <param name="package">python-matheval</param>
    <param name="deploy_playbook">deploy-python-matheval.yml</param>
  </params>
Since there are two pipelines that share the same template, the second pipeline
(for package package-info) also needs a deployment playbook. It is very
similar to the one for python-matheval, it just lacks the smoke test for now.
Conclusion
Writing a small amount of smoke tests is very beneficial for the stability of your applications.
Rolling updates with integrated smoke tests for each system involved are pretty easy to do with ansible, and can be integrated into the GoCD pipeline with little effort. They mitigate the damage of deploying a bad version or a bad configuration by limiting it to one system, or a small number of systems in a bigger cluster.
With this addition, the deployment pipeline is likely to be as least as robust as most manual deployment processes, but much less effort, easier to scale to more packages, and gives more insight about the timeline of deployments and installed versions.
I'm writing a book on automating deployments. If this topic interests you, please sign up for the Automating Deployments newsletter. It will keep you informed about automating and continuous deployments. It also helps me to gauge interest in this project, and your feedback can shape the course it takes.
Tue, 14 Jun 2016
Automated Deployments: Unit Testing
Permanent link
Automated testing is absolutely essential for automated deployments. When you automate deployments, you automatically do them more often than before, which means that manual testing becomes more effort, more annoying, and is usually skipped sooner or later.
So to maintain a high degree of confidence that a deployment won't break the application, automated tests are the way to go.
And yet, I've written twenty blog posts about automating deployments, and this is the first about testing. Why did I drag my feet like this?
For one, testing is hard to generalize. But more importantly, the example project used so far doesn't play well with my usual approach to testing.
Of course one can still test it, but it's not an idiomatic approach that scales to real applications.
The easy way out is to consider a second example project. This also provides a good excuse to test the GoCD configuration template, and explore another way to build Debian packages.
Meet python-matheval
python-matheval is a stupid little web service that accepts a tree of mathematical expressions encoded in JSON format, evaluates it, and returns the result in the response. And as the name implies, it's written in python. Python3, to be precise.
The actual evaluation logic is quite compact:
# file src/matheval/evaluator.py
from functools import reduce
import operator

ops = {
    '+': operator.add,
    '-': operator.add,
    '*': operator.mul,
    '/': operator.truediv,
}

def math_eval(tree):
    if not isinstance(tree, list):
        return tree
    op = ops[tree.pop(0)]
    return reduce(op, map(math_eval, tree))
Exposing it to the web isn't much effort either, using the Flask library:
# file src/matheval/frontend.py
#!/usr/bin/python3

from flask import Flask, request

from matheval.evaluator import math_eval

app = Flask(__name__)

@app.route('/', methods=['GET', 'POST'])
def index():
    tree = request.get_json(force=True)
    result = math_eval(tree);
    return str(result) + "\n"

if __name__ == '__main__':
    app.run(debug=True)
The rest of the code is part of the build system. As a python package, it
should have a setup.py in the root directory
# file setup.py
!/usr/bin/env python

from setuptools import setup

setup(name='matheval',
      version='1.0',
      description='Evaluation of expression trees',
      author='Moritz Lenz',
      author_email='moritz.lenz@gmail.com',
      url='https://deploybook.com/',
      package_dir={'': 'src'},
      requires=['flask', 'gunicorn'],
      packages=['matheval']
     )
Once a working setup script is in place, the tool dh-virtualenv can be used to create a Debian package containing the project itself and all of the python-level dependencies.
This creates rather large Debian packages (in this case, around 4 MB for less than a kilobyte of actual application code), but on the upside it allows several applications on the same machine that depend on different versions of the same python library. The simple usage of the resulting Debian packages makes it well worth in many use cases.
Using dh-virtualenv is quite easy:
# file debian/rules
#!/usr/bin/make -f
export DH_VIRTUALENV_INSTALL_ROOT=/usr/share/python-custom

%:
    dh $@ --with python-virtualenv --with systemd

override_dh_virtualenv:
    dh_virtualenv --python=/usr/bin/python3
See the github repository for all the other boring details, like the systemd service files and the control file.
The integration into the GoCD pipeline is easy, using the previously developed configuration template:
<pipeline name="python-matheval" template="debian-base">
  <params>
    <param name="distribution">jessie</param>
    <param name="package">python-matheval</param>
    <param name="target">web</param>
  </params>
  <materials>
    <git url="https://github.com/moritz/python-matheval.git" dest="python-matheval" materialName="python-matheval" />
    <git url="https://github.com/moritz/deployment-utils.git" dest="deployment-utils" materialName="deployment-utils" />
  </materials>
</pipeline>
Getting Started with Testing, Finally
It is good practise and a good idea to cover business logic with unit tests.
The way that evaluation logic is split into a separate function makes it easy to test said function in isolation. A typical way is to feed some example inputs into the function, and check that the return value is as expected.
# file test/test-evaluator.py
import unittest
from matheval.evaluator import math_eval

class EvaluatorTest(unittest.TestCase):
    def _check(self, tree, expected):
        self.assertEqual(math_eval(tree), expected)

    def test_basic(self):
        self._check(5, 5)
        self._check(['+', 5], 5)
        self._check(['+', 5, 7], 12)
        self._check(['*', ['+', 5, 4], 2], 18)

if __name__ == '__main__':
    unittest.main()
One can execute the test suite (here just one test file so far) with the
nosetests command from the nose python package:
$ nosetests
.
----------------------------------------------------------------------
Ran 1 test in 0.004s

OK
The python way of exposing the test suite is to implement
the test command in setup.py, which can be done with the line
test_suite='nose.collector',
in the setup() call in setup.py. And of course one needs to add nose to
the list passed to the requires argument.
With these measures in place, the debhelper and dh-virtualenv tooling takes care of executing the test suite as part of the Debian package build. If any of the tests fail, so does the build.
Running the test suite in this way is advantageous, because it runs the tests with exactly the same versions of all involved python libraries as end up in Debian package, and thus make up the runtime environment of the application. It is possible to achieve this through other means, but other approaches usually take much more work.
Conclusions
You should have enough unit tests to make you confident that the core logic of your application works correctly. It is a very easy and pragmatic solution to run the unit tests as part of the package build, ensuring that only "good" versions of your software are ever packaged and installed.
In future blog posts, other forms of testing will be explored.
I'm writing a book on automating deployments. If this topic interests you, please sign up for the Automating Deployments newsletter. It will keep you informed about automating and continuous deployments. It also helps me to gauge interest in this project, and your feedback can shape the course it takes.
Thu, 02 Jun 2016
Story Time: Rollbacks Saved the Day
Permanent link
At work we develop, among other things, an internally used web application based on AngularJS. Last Friday, we received a rather urgent bug report that in a co-worker's browser, a rather important page wouldn't load at all, and show three empty error notifications.
Only one of our two frontend developers was present, and she didn't immediately know what was wrong or how to fix it. And what's worse, she couldn't reproduce the problem in her own browser.
A quick look into our Go CD instance showed that the previous production deployment of this web application was on the previous day, and we had no report of similar errors previous to that, so we decided to do a rollback to the previous version.
I recently blogged about deploying specific versions, which allows you to do rollbacks easily. And in fact I had implemented that technique just two weeks before this incident. To make the rollback happen, I just had to click on the "rerun" button of the installation stage of the last good deployment, and wait for a short while (about a minute).
Since I had a browser where I could reproduce the problem, I could verify that the rollback had indeed solved the problem, and our co-worker was able to continue his work. This took the stress off the frontend developers, who didn't have to hurry to fix the bug in a haste. Instead, they just had to fix it before the next production deployment. Which, in this case, meant it was possible to wait to the next working day, when the second developer was present again.
For me, this episode was a good validation of the rollback mechanism in the deployment pipeline.
Postskriptum: The Bug
In case you wonder, the actual bug that triggered the incident was related to caching. The web application just introduced caching of data in the browser's local storage. In Firefox on Debian Jessie and some Mint versions, writing to the local storage raised an exception, which the web application failed to catch. Firefox on Ubuntu and Mac OS X didn't produce the same problem.
Curiously, Firefox was configured to allow the usage of local storage for this domain, the default of allowing around 5MB was unchanged, and both existing local storage and the new-to-be-written on was in the low kilobyte range. A Website that experimentally determines the local storage size confirmed it to be 5200 kb. So I suspect that there is a Firefox bug involved on these platforms as well.
I'm writing a book on automating deployments. If this topic interests you, please sign up for the Automating Deployments newsletter. It will keep you informed about automating and continuous deployments. It also helps me to gauge interest in this project, and your feedback can shape the course it takes.
Sat, 14 May 2016
Automatically Deploying Specific Versions
Permanent link
Versions. Always talking about versions. So, more talk about versions.
The installation pipeline from a previous installment always installs the newest version available. In a normal, simple, linear development flow, this is fine, and even in other workflows, it's a good first step.
But we really want the pipeline to deploy the exact versions that was built inside the same instance of the pipeline. The obvious benefit is that it allows you to rerun older versions of the pipeline to install older versions, effectively giving you a rollback.
Or you can build a second pipeline for hotfixes, based on the same git repository but a different branch, and when you do want a hotfix, you simply pause the regular pipeline, and trigger the hotfix pipeline. In this scenario, if you always installed the newest version, finding a proper version string for the hotfix is nearly impossible, because it needs to be higher than the currently installed one, but also lower than the next regular build. Oh, and all of that automatically please.
A less obvious benefit to installing a very specific version is that it detects error in the package source configuration of the target machines. If the deployment script just installs the newest version that's available, and through an error the repository isn't configured on the target machine, the installation process becomes a silent no-op if the package is already installed in an older version.
Implementation
There are two things to do: figure out version to install of the package, and and then do it.
The latter step is fairly easy, because the ansible "apt" module that I use for installation supports, and even has an example in the documentation:
# Install the version '1.00' of package "foo"
- apt: name=foo=1.00 state=present
Experimenting with this feature shows that in case this is a downgrade, you
also need to add force=yes.
Knowing the version number to install also has a simple, though maybe not obvious solution: write the version number to a file, collect this file as an artifact in GoCD, and then when it's time to install, fetch the artifact, and read the version number from it.
When I last talked about the build
step,
I silently introduced configuration that collects the version file that the
debian-autobuild
script
writes:
  <job name="build-deb" timeout="5">
    <tasks>
      <exec command="../deployment-utils/debian-autobuild" workingdir="#{package}" />
    </tasks>
    <artifacts>
      <artifact src="version" />
      <artifact src="package-info*_*" dest="package-info/" />
    </artifacts>
  </job>
So only the actual installation step needs adjusting. This is what the configuration looked like:
  <job name="deploy-testing">
    <tasks>
      <exec command="ansible" workingdir="deployment-utils/ansible/">
        <arg>--sudo</arg>
        <arg>--inventory-file=testing</arg>
        <arg>web</arg>
        <arg>-m</arg>
        <arg>apt</arg>
        <arg>-a</arg>
        <arg>name=package-info state=latest update_cache=yes</arg>
        <runif status="passed" />
      </exec>
    </tasks>
  </job>
So, first fetch the version file:
      <job name="deploy-testing">
        <tasks>
          <fetchartifact pipeline="" stage="build" job="build-deb" srcfile="version" />
          ...
Then, how to get the version from the file to ansible? One could either use
ansible's lookup('file',
path) function, or
write a small script. I decided to the latter, since I was originally more
aware of bash's capabilities than of ansible's, and it's only a one-liner
anyway:
...
<exec command="/bin/bash" workingdir="deployment-utils/ansible/">
<arg>-c</arg>
<arg>ansible --sudo --inventory-file=testing #{target} -m apt -a "name=#{package}=$(< ../../version) state=present update_cache=yes force=yes"</arg>
</exec>
</tasks>
</job>
Bash's $(...) opens a sub-process (which again is a bash instance), and
inserts the output from that sub-process into the command line. <
../../version is a short way of reading the file. And, this being XML, the
less-than sign needs to be escaped.
The production deployment configuration looks pretty much the same, just with
--inventory-file=production.
Try it!
To test the version-specific package installation, you need to have at least
two runs of the pipeline that captured the version artifact. If you don't
have that yet, you can push commits to the source repository, and GoCD picks
them up automatically.
You can query the installed version on the target machine with
dpkg -l package-info. After the last run, the version built in that pipeline
instance should be installed.
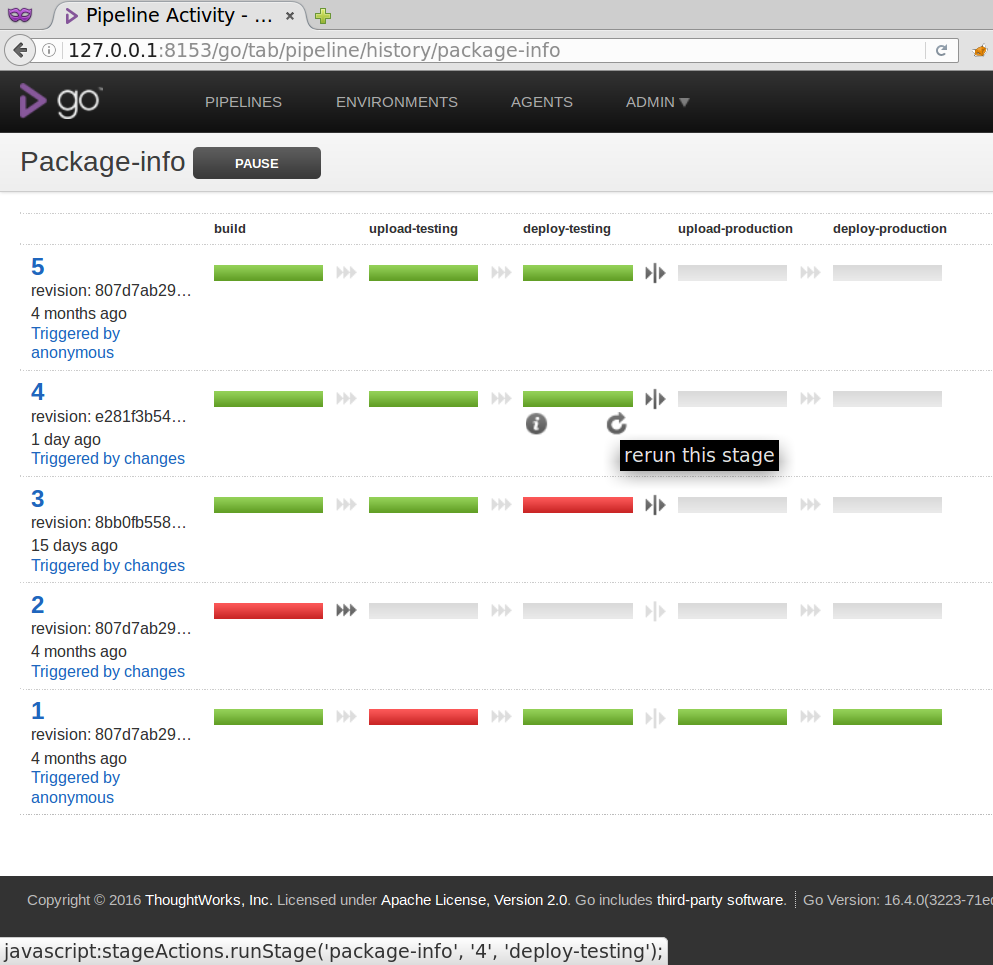
Then you can rerun the deployment stage from a previous pipeline, for example in the history view of the pipeline by hovering with the mouse over the stage, and then clicking on the circle with the arrow on it that triggers the rerun.
After the stage rerun has completed, checking the installed version again should yield the version built in the pipeline instance that you selected.
Conclusions
Once you know how to set up your pipeline to deploy exactly the version that was built in the same pipeline instance, it is fairly easy to implement.
Once you've done that, you can easily deploy older versions of your software as a step back scenario, and use the same mechanism to automatically build and deploy hotfixes.
I'm writing a book on automating deployments. If this topic interests you, please sign up for the Automating Deployments newsletter. It will keep you informed about automating and continuous deployments. It also helps me to gauge interest in this project, and your feedback can shape the course it takes.
Sat, 07 May 2016
Automating Deployments: Pipeline Templates in GoCD
Permanent link
In the last few blog post, you've seen the development of a GoCD pipeline for building a package, uploading it into repository for a testing environment, installing it in that environment, and then repeating the upload and installation cycle for a production environment.
To recap, this the XML config for GoCD so far:
<pipeline name="package-info">
  <materials>
    <git url="https://github.com/moritz/package-info.git" dest="package-info" materialName="package-info" />
    <git url="https://github.com/moritz/deployment-utils.git" dest="deployment-utils" materialName="deployment-utils" />
  </materials>
  <stage name="build" cleanWorkingDir="true">
    <jobs>
      <job name="build-deb" timeout="5">
        <tasks>
          <exec command="../deployment-utils/debian-autobuild" workingdir="#{package}" />
        </tasks>
        <artifacts>
          <artifact src="version" />
          <artifact src="package-info*_*" dest="package-info/" />
        </artifacts>
      </job>
    </jobs>
  </stage>
  <stage name="upload-testing">
    <jobs>
      <job name="upload-testing">
        <tasks>
          <fetchartifact pipeline="" stage="build" job="build-deb" srcdir="package-info">
            <runif status="passed" />
          </fetchartifact>
          <exec command="/bin/bash">
            <arg>-c</arg>
            <arg>deployment-utils/add-package testing jessie package-info_*.deb</arg>
          </exec>
        </tasks>
        <resources>
          <resource>aptly</resource>
        </resources>
      </job>
    </jobs>
  </stage>
  <stage name="deploy-testing">
    <jobs>
      <job name="deploy-testing">
        <tasks>
          <exec command="ansible" workingdir="deployment-utils/ansible/">
            <arg>--sudo</arg>
            <arg>--inventory-file=testing</arg>
            <arg>web</arg>
            <arg>-m</arg>
            <arg>apt</arg>
            <arg>-a</arg>
            <arg>name=package-info state=latest update_cache=yes</arg>
            <runif status="passed" />
          </exec>
        </tasks>
      </job>
    </jobs>
  </stage>
  <stage name="upload-production">
    <approval type="manual" />
    <jobs>
      <job name="upload-production">
        <tasks>
          <fetchartifact pipeline="" stage="build" job="build-deb" srcdir="package-info">
            <runif status="passed" />
          </fetchartifact>
          <exec command="/bin/bash">
            <arg>-c</arg>
            <arg>deployment-utils/add-package production jessie package-info_*.deb</arg>
          </exec>
        </tasks>
        <resources>
          <resource>aptly</resource>
        </resources>
      </job>
    </jobs>
  </stage>
  <stage name="deploy-production">
    <jobs>
      <job name="deploy-production">
        <tasks>
          <exec command="ansible" workingdir="deployment-utils/ansible/">
            <arg>--sudo</arg>
            <arg>--inventory-file=production</arg>
            <arg>web</arg>
            <arg>-m</arg>
            <arg>apt</arg>
            <arg>-a</arg>
            <arg>name=package-info state=latest update_cache=yes</arg>
            <runif status="passed" />
          </exec>
        </tasks>
      </job>
    </jobs>
  </stage>
</pipeline>
The interesting thing here is that the pipeline isn't very specific to this project. Apart from the package name, the Debian distribution and the group of hosts to which to deploy, everything in here can be reused to any software that's Debian packaged.
To make the pipeline more generic, we can define parameters, short params
  <params>
    <param name="distribution">jessie</param>
    <param name="package">package-info</param>
    <param name="target">web</param>
  </params>
And then replace all the occurrences of package-info inside the stages definition with #{package}and so on:
  <stage name="build" cleanWorkingDir="true">
    <jobs>
      <job name="build-deb" timeout="5">
        <tasks>
          <exec command="../deployment-utils/debian-autobuild" workingdir="#{package}" />
        </tasks>
        <artifacts>
          <artifact src="version" />
          <artifact src="#{package}*_*" dest="#{package}/" />
        </artifacts>
      </job>
    </jobs>
  </stage>
  <stage name="upload-testing">
    <jobs>
      <job name="upload-testing">
        <tasks>
          <fetchartifact pipeline="" stage="build" job="build-deb" srcdir="#{package}">
            <runif status="passed" />
          </fetchartifact>
          <exec command="/bin/bash">
            <arg>-c</arg>
            <arg>deployment-utils/add-package testing #{distribution} #{package}_*.deb</arg>
          </exec>
        </tasks>
        <resources>
          <resource>aptly</resource>
        </resources>
      </job>
    </jobs>
  </stage>
  <stage name="deploy-testing">
    <jobs>
      <job name="deploy-testing">
        <tasks>
          <exec command="ansible" workingdir="deployment-utils/ansible/">
            <arg>--sudo</arg>
            <arg>--inventory-file=testing</arg>
            <arg>#{target}</arg>
            <arg>-m</arg>
            <arg>apt</arg>
            <arg>-a</arg>
            <arg>name=#{package} state=latest update_cache=yes</arg>
            <runif status="passed" />
          </exec>
        </tasks>
      </job>
    </jobs>
  </stage>
  <stage name="upload-production">
    <approval type="manual" />
    <jobs>
      <job name="upload-production">
        <tasks>
          <fetchartifact pipeline="" stage="build" job="build-deb" srcdir="#{package}">
            <runif status="passed" />
          </fetchartifact>
          <exec command="/bin/bash">
            <arg>-c</arg>
            <arg>deployment-utils/add-package production #{distribution} #{package}_*.deb</arg>
          </exec>
        </tasks>
        <resources>
          <resource>aptly</resource>
        </resources>
      </job>
    </jobs>
  </stage>
  <stage name="deploy-production">
    <jobs>
      <job name="deploy-production">
        <tasks>
          <exec command="ansible" workingdir="deployment-utils/ansible/">
            <arg>--sudo</arg>
            <arg>--inventory-file=production</arg>
            <arg>#{target}</arg>
            <arg>-m</arg>
            <arg>apt</arg>
            <arg>-a</arg>
            <arg>name=#{package} state=latest update_cache=yes</arg>
            <runif status="passed" />
          </exec>
        </tasks>
      </job>
    </jobs>
  </stage>
The next step towards generalization is to move the stages to a template. This can either be done again by editing the XML config, or in the web frontend with Admin → Pipelines and then clicking the Extract Template link next to the pipeline called package-info.
Either way, the result in the XML looks like this:
<pipelines group="deployment">
  <pipeline name="package-info" template="debian-base">
    <params>
      <param name="distribution">jessie</param>
      <param name="package">package-info</param>
      <param name="target">web</param>
    </params>
    <materials>
      <git url="https://github.com/moritz/package-info.git" dest="package-info" materialName="package-info" />
      <git url="https://github.com/moritz/deployment-utils.git" dest="deployment-utils" materialName="deployment-utils" />
    </materials>
  </pipeline>
</pipelines>
<templates>
  <pipeline name="debian-base">
      <!-- stages definitions go here -->
  </pipeline>
</templates>
Everything that's specific to this one software is now in the pipeline definition, and the reusable parts are in the template. With the sole exception of the deployment-utils repo, which must be added for software that is being automatically deployed, since GoCD has no way to move a material to a template.
Adding a deployment pipeline for another piece of software is now just a matter of specifying the URL, package name, target (that is, name of a group in the Ansible inventory file) and distribution. So about a minute of work once you're used to the tooling.
I'm writing a book on automating deployments. If this topic interests you, please sign up for the Automating Deployments newsletter. It will keep you informed about automating and continuous deployments. It also helps me to gauge interest in this project, and your feedback can shape the course it takes.
Mon, 02 May 2016
Automating Deployments: Installation in the Pipeline
Permanent link
As [mentioned before](perlgeek.de/blog-en/automating-deployments/2016-007-installing-packages.html), my tool of choice for automating package installation is [ansible](https://deploybook.com/resources).
The first step is to create an inventory file for ansible. In a real deployment setting, this would contain the hostnames to deploy to. For the sake of this project I just have a test setup consisting of virtual machines managed by vagrant, which leads to a somewhat unusual ansible configuration.
That's the ansible.cfg:
[defaults]
remote_user = vagrant
host_key_checking = False
And the inventory file called testing for the testing environment:
[web]
testserver ansible_ssh_host=127.0.0.1 ansible_ssh_port=2345
(The host is localhost here, because I run a vagrant setup to test the pipeline; In a real setting, it would just be the hostname of your test machine).
All code and configuration goes to version control, I created an ansible
directory in the deployment-utils
repo and dumped the files there.
Finally I copied the ssh private key (from vagrant ssh-config) to
/var/go/.ssh/id_rsa, adjusted the owner to user go, and was ready to go.
Plugging it into GoCD
Automatically installing a newly built package through GoCD in the testing environment is just another stage away:
  <stage name="deploy-testing">
    <jobs>
      <job name="deploy-testing">
        <tasks>
          <exec command="ansible" workingdir="deployment-utils/ansible/">
            <arg>--sudo</arg>
            <arg>--inventory-file=testing</arg>
            <arg>web</arg>
            <arg>-m</arg>
            <arg>apt</arg>
            <arg>-a</arg>
            <arg>name=package-info state=latest update_cache=yes</arg>
            <runif status="passed" />
          </exec>
        </tasks>
      </job>
    </jobs>
  </stage>
The central part is an invocation of ansible in the newly created directory
of the deployment--utils repository.
Results
To run the new stage, either trigger a complete run of the pipeline by hitting the "play" triangle in the pipeline overview in web frontend, or do a manual trigger of that one stage in the pipe history view.
You can log in on the target machine to check if the package was successfully installed:
vagrant@debian-jessie:~$ dpkg -l package-info
Desired=Unknown/Install/Remove/Purge/Hold
| Status=Not/Inst/Conf-files/Unpacked/halF-conf/Half-inst/trig-aWait/Trig-pend
|/ Err?=(none)/Reinst-required (Status,Err: uppercase=bad)
||/ Name           Version      Architecture Description
+++-==============-============-============-=================================
ii  package-info   0.1-0.7.1    all          Web service for getting a list of
and verify that the service is running:
vagrant@debian-jessie:~$ systemctl status package-info
● package-info.service - Package installation information via http
   Loaded: loaded (/lib/systemd/system/package-info.service; static)
   Active: active (running) since Sun 2016-03-27 13:15:41 GMT; 4h 6min ago
  Process: 4439 ExecStop=/usr/bin/hypnotoad -s /usr/lib/package-info/package-info (code=exited, status=0/SUCCESS)
 Main PID: 4442 (/usr/lib/packag)
   CGroup: /system.slice/package-info.service
           ├─4442 /usr/lib/package-info/package-info
           ├─4445 /usr/lib/package-info/package-info
           ├─4446 /usr/lib/package-info/package-info
           ├─4447 /usr/lib/package-info/package-info
           └─4448 /usr/lib/package-info/package-info
and check that it responds on port 8080, as it's supposed to:
    vagrant@debian-jessie:~$ curl http://127.0.0.1:8080/|head -n 7
      % Total    % Received % Xferd  Average Speed   Time    Time     Time  Current
                                     Dload  Upload   Total   Spent    Left  Speed
      0     0    0     0    0     0      0      0 --:--:-- --:--:-- --:--:--     0Desired=Unknown/Install/Remove/Purge/Hold
    | Status=Not/Inst/Conf-files/Unpacked/halF-conf/Half-inst/trig-aWait/Trig-pend
    |/ Err?=(none)/Reinst-required (Status,Err: uppercase=bad)
    ||/ Name                           Version                     Architecture Description
    +++-==============================-===========================-============-===============================================================================
    ii  acl                            2.2.52-2                    amd64        Access control list utilities
    ii  acpi                           1.7-1                       amd64        displays information on ACPI devices
    curl: (23) Failed writing body (2877 != 16384)
The last line is simply curl complaining that it can't write the full output,
due to the pipe to head exiting too early to receive all the contents. We can safely ignore that.
Going All the Way to Production
Uploading and deploying to production works the same as with the testing
environment. So all that's needed is to duplicate the configuration of the
last two pipelines, replace every occurrence of testing with pproduction,
and add a manual approval button, so that production deployment remains a
conscious decision:
  <stage name="upload-production">
    <approval type="manual" />
    <jobs>
      <job name="upload-production">
        <tasks>
          <fetchartifact pipeline="" stage="build" job="build-deb" srcdir="package-info">
            <runif status="passed" />
          </fetchartifact>
          <exec command="/bin/bash">
            <arg>-c</arg>
            <arg>deployment-utils/add-package production jessie package-info_*.deb</arg>
          </exec>
        </tasks>
        <resources>
          <resource>aptly</resource>
        </resources>
      </job>
    </jobs>
  </stage>
  <stage name="deploy-production">
    <jobs>
      <job name="deploy-production">
        <tasks>
          <exec command="ansible" workingdir="deployment-utils/ansible/">
            <arg>--sudo</arg>
            <arg>--inventory-file=production</arg>
            <arg>web</arg>
            <arg>-m</arg>
            <arg>apt</arg>
            <arg>-a</arg>
            <arg>name=package-info state=latest update_cache=yes</arg>
            <runif status="passed" />
          </exec>
        </tasks>
      </job>
    </jobs>
  </stage>
The only real news here is the second line:
<approval type="manual" />
which makes GoCD only proceed to this stage when somebody clicks the approval arrow in the web interface.
You also need to fill out the inventory file called production with the list
of your server or servers.
Achievement Unlocked: Basic Continuous Delivery
Let's recap, the pipeline
- is triggered automatically from commits in the source code
- automatically builds a Debian package from each commit
- uploads it to a repository for the testing environment
- automatically installs it in the testing environment
- upon manual approval, uploads it to a repository for the production environment
- ... and automatically installs the new version in production.
So the basic framework for Continuous Delivery is in place.
Wow, that escalated quickly.
Missing Pieces
Of course, there's lots to be done before we can call this a fully-fledged Continuous Delivery pipeline:
- Automatic testing
- Generalization to other software
- version pinning (always installing the correct version, not the newest one).
- Rollbacks
- Data migration
But even as is, the pipeline can provide quite some time savings and shortened feedback cycles. The manual approval before production deployment is a good hook for manual tasks, such as manual tests.
I'm writing a book on automating deployments. If this topic interests you, please sign up for the Automating Deployments newsletter. It will keep you informed about automating and continuous deployments. It also helps me to gauge interest in this project, and your feedback can shape the course it takes.
Sat, 30 Apr 2016
Automating Deployments: Stage 2: Uploading
Permanent link
Once you have the pipeline for building a package, it's time to distribute the freshly built package to the machines where it's going to be installed on.
I've previously explained the nuts and bolts of getting a Debian package into a repository managed by aptly so it's time to automate that.
Some Assumptions
We are going to need a separate repository for each environment we want to deploy to (or maybe group of environments; it might be OK and even desirable to share a repository between various testing environments that can be used in parallel, for example for security, performance and functional testing).
At some point in the future, when a new version of the operating system is
released, we'll also need to build packages for another major version, so for
example for Debian stretch instead of jessie. So it's best to plan for
that case. Based on these assumptions, the path to each repository will be
$HOME/aptly/$environment/$distribution.
For the sake of simplicity, I'm going to assume a single host on which both testing and production repositories will be hosted on from separate directories. If you need those repos on separate servers, it's easy to reverse that decision (or make a different one in the first place).
To easy the transportation and management of the repository, a GoCD agent should be running on the repo server. It can copy the packages from the GoCD server's artifact repository with built-in commands.
Scripting the Repository Management
It would be possible to manually initialize each repository, and only automate the process of adding a package. But since it's not hard to do, taking the opposite route of creating automatically on the fly is more reliable. The next time you need a new environment or need to support a new distribution you will benefit from this decision.
So here is a small Perl program that, given an environment, distribution and a package file name, creates the aptly repo if it doesn't exist yet, writes the config file for the repo, and adds the package.
#!/usr/bin/perl
use strict;
use warnings;
use 5.014;
use JSON qw(encode_json);
use File::Path qw(mkpath);
use autodie;

unless ( @ARGV == 3) {
    die "Usage: $0 <environment> <distribution> <.deb file>\n";
}
my ( $env, $distribution, $package ) = @ARGV;

my $base_path   = "$ENV{HOME}/aptly";
my $repo_path   = "$base_path/$env/$distribution";
my $config_file = "$base_path/$env-$distribution.conf";
my @aptly_cmd   = ("aptly", "-config=$config_file");

init_config();
init_repo();
add_package();


sub init_config {
    mkpath $base_path;
    open my $CONF, '>:encoding(UTF-8)', $config_file;
    say $CONF encode_json( {
    rootDir => $repo_path,
    architectures => [qw( i386 amd64 all )],
    });
    close $CONF;
}

sub init_repo {
    return if -d "$repo_path/db";
    mkpath $repo_path;
    system @aptly_cmd, "repo", "create", "-distribution=$distribution", "myrepo";
    system @aptly_cmd, "publish", "repo", "myrepo";
}

sub add_package {
    system @aptly_cmd,  "repo", "add", "myrepo", $package;
    system @aptly_cmd,  "publish", "update", $distribution;
}
As always, I've developed and tested this script interactively, and only started to plug it into the automated pipeline once I was confident that it did what I wanted.
And as all software, it's meant to be under version control, so it's now part of the deployment-utils git repo.
More Preparations: GPG Key
Before GoCD can upload the debian packages into a repository, the go agent
needs to have a GPG key that's not protected by a password. You can either log
into the go system user account and create it there with gpg --gen-key, or
copy an existing .gnupg directory over to ~go (don't forget to adjust the
ownership of the directory and the files in there).
Integrating the Upload into the Pipeline
The first stage of the pipeline builds the Debian package, and
records the resulting file as an artifact. The upload step needs to retrieve
this artifact with a fetchartifact task. This is the config for the second
stage, to be inserted directly after the first one:
  <stage name="upload-testing">
    <jobs>
      <job name="upload-testing">
        <tasks>
          <fetchartifact pipeline="" stage="build" job="build-deb" srcdir="package-info">
            <runif status="passed" />
          </fetchartifact>
          <exec command="/bin/bash">
            <arg>-c</arg>
            <arg>deployment-utils/add-package testing jessie package-info_*.deb</arg>
          </exec>
        </tasks>
        <resources>
          <resource>aptly</resource>
        </resources>
      </job>
    </jobs>
  </stage>
Note that testing here refers to the name of the environment (which you can
chose freely, as long as you are consistent), not the testing distribution of
the Debian project.
There is a aptly resource, which you must assign to the agent running on the
repo server. If you want separate servers for testing and production
repositories, you'd come up with a more specific resource name here (for
example `aptly-testing^) and a separate one for the production repository.
Make the Repository Available through HTTP
To make the repository reachable from other servers, it needs to be exposed to the network. The most convenient way is over HTTP. Since only static files need to be served (and a directory index), pretty much any web server will do.
An example config for lighttpd:
dir-listing.encoding = "utf-8"
server.dir-listing   = "enable"
alias.url = (
    "/debian/testing/jessie/"    => "/var/go/aptly/testing/jessie/public/",
    "/debian/production/jessie/" => "/var/go/aptly/production/jessie/public/",
    # more repos here
)
And for the Apache HTTP server, once you've configured a virtual host:
Options +Indexes
Alias /debian/testing/jessie/     /var/go/aptly/testing/jessie/public/
Alias /debian/production/jessie/  /var/go/aptly/production/jessie/public/
# more repos here
Achievement Unlocked: Automatic Build and Distribution
With theses steps done, there is automatic building and upload of packages in place. Since client machines can pull from that repository at will, we can tick off the distribution of packages to the client machines.
I'm writing a book on automating deployments. If this topic interests you, please sign up for the Automating Deployments newsletter. It will keep you informed about automating and continuous deployments. It also helps me to gauge interest in this project, and your feedback can shape the course it takes.
Sun, 24 Apr 2016
Automating Deployments: Building in the Pipeline
Permanent link
The first step of an automated deployment system is always the build. (For a software that doesn't need a build to be tested, the test might come first, but stay with me nonetheless).
At this point, I assume that there is already a build system in place that produces packages in the desired format, here .deb files. Here I will talk about integrating this build step into a pipeline that automatically polls new versions from a git repository, runs the build, and records the resulting .deb package as a build artifact.
A GoCD Build Pipeline
As mentioned earlier, my tool of choice of controlling the pipeline is Go Continuous Delivery. Once you have it installed and configured an agent, you can start to create a pipeline.
GoCD lets you build pipelines in its web interface, which is great for exploring the available options. But for a blog entry, it's easier to look at the resulting XML configuration, which you can also enter directly ("Admin" → "Config XML").
So without further ado, here's the first draft:
  <pipelines group="deployment">
    <pipeline name="package-info">
      <materials>
        <git url="https://github.com/moritz/package-info.git" dest="package-info" />
      </materials>
      <stage name="build" cleanWorkingDir="true">
        <jobs>
          <job name="build-deb" timeout="5">
            <tasks>
              <exec command="/bin/bash" workingdir="package-info">
                <arg>-c</arg>
                <arg>debuild -b -us -uc</arg>
              </exec>
            </tasks>
            <artifacts>
              <artifact src="package-info*_*" dest="package-info/" />
            </artifacts>
          </job>
        </jobs>
      </stage>
    </pipeline>
  </pipelines>
The outer-most group is a pipeline group, which has a name. It can be used to make it easier to get an overview of available pipelines, and also to manage permissions. Not very interesting for now.
The second level is the <pipeline> with a name, and it contains a list of
materials and one or more stages.
Materials
A material is anything that can trigger a pipeline, and/or provide files that commands in a pipeline can work with. Here the only material is a git repository, which GoCD happily polls for us. When it detects a new commit, it triggers the first stage in the pipeline.
Directory Layout
Each time a job within a stage is run, the go agent (think worker) which runs
it prepares a directory in which it makes the materials available. On linux,
this directory defaults to /var/lib/go-agent/pipelines/$pipline_name.
Paths in the GoCD configuration are typically relative to this path.
For example the material definition above contains the attribute
dest="package-info", so the absolute path to this git repository is
/var/lib/go-agent/pipelines/package-info/package-info. Leaving out the
dest="..." works, and gives on less level of directory, but only works for a
single material. It is a rather shaky assumption that you won't need a second
material, so don't do that.
See the config references for a list of available material types and options. Plugins are available that add further material types.
Stages
All the stages in a pipeline run serially, and each one only if the previous stage succeed. A stage has a name, which is used both in the front end, and for fetching artifacts.
In the example above, I gave the stage the attribute
cleanWorkingDir="true", which makes GoCD delete files created during the
previous build, and discard changes to files under version control. This tends
to be a good option to use, otherwise you might unknowingly slide into a
situation where a previous build affects the current build, which can be
really painful to debug.
Jobs, Tasks and Artifacts
Jobs are potentially executed in parallel within a stage, and have names for the same reasons that stages do.
Inside a job there can be one or more tasks. Tasks are executed serially
within a job. I tend to mostly use <exec> tasks (and <fetchartifact>,
which I will cover in a later blog post), which invoke system commands. They
follow the UNIX convention of treating an exit status of zero as success, and
everything else as a failure.
For more complex commands, I create shell or Perl scripts inside a git repository, and add repository as a material to the pipeline, which makes them available during the build process with no extra effort.
The <exec> task in our example invokes /bin/bash -c 'debuild -b -us -uc'.
Which is a case of Cargo Cult
Programming, because
invoking debuild directly works just as well. Ah well, will revise later.
debuild -b -us -uc builds the Debian package, and is executed inside the git
checkout of the source. It produces a .deb file, a .changes file and possibly
a few other files with meta data. They are created one level above the git
checkout, so in the root directory of the pipeline run.
These are the files that we want to work with later on, we let GoCD store them
in an internal database. That's what the <artifact> instructs GoCD to do.
Since the name of the generated files depends on the version number of the
built Debian package (which comes from the debian/changelog file in the git
repo), it's not easy to reference them by name later on. That's where the
dest="package-info/" comes in play: it makes GoCD store the artifacts in a
directory with a fixed name. Later stages then can retrieve all artifact files
from this directory by the fixed name.
The Pipeline in Action
If nothing goes wrong (and nothing ever does, right?), this is roughly what the web interface looks like after running the new pipeline:
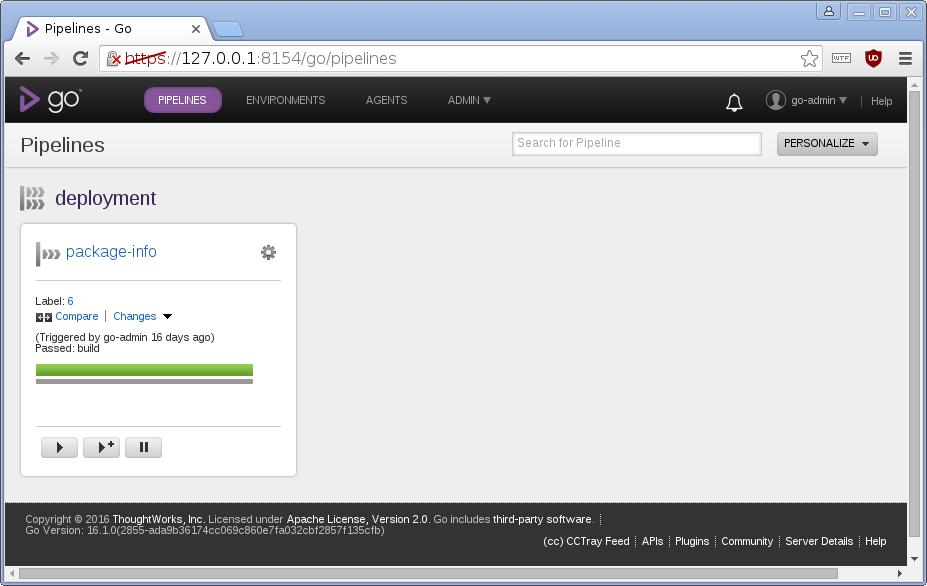
So, whenever there is a new commit in the git repository, GoCD happily builds a Debian pacckage and stores it for further use. Automated builds, yay!
But there is a slight snag: It recycles version numbers, which other Debian tools are very unhappy about. In the next blog post, I'll discuss a way to deal with that.
I'm writing a book on automating deployments. If this topic interests you, please sign up for the Automating Deployments newsletter. It will keep you informed about automating and continuous deployments. It also helps me to gauge interest in this project, and your feedback can shape the course it takes.
Automating Deployments: Version Recycling Considered Harmful
Permanent link
In the previous installment we saw a GoCD configuration that automatically built a Debian package from a git repository whenever somebody pushes a new commit to the git repo.
The version of the generated Debian package comes from the debian/changelog
file of the git repository. Which means that whenever somebody pushes code or
doc changes without a new changelog entry, the resulting Debian package has
the same version number as the previous one.
The problem with this version recycling is that most Debian tooling assumes that the tuple of package name, version and architecture uniquely identifies a revision of a package. So stuffing a new version of a package with an old version number into a repository is bound to cause trouble; most repository management software simply refuses to accept that. On the target machine, upgrade the package won't do anything if the version number stays the same.
So, its a good idea to put a bit more thought into the version string of the automatically built Debian package.
Constructing Unique Version Numbers
There are several source that you can tap to generate unique version numbers:
- Randomness (for example in the form of UUIDs)
- The current date and time
- The git repository itself
- GoCD exposes several environment variables that can be of use
The latter is quite promising: GO_PIPELINE_COUNTER is a monotonic counter
that increases each time GoCD runs the pipeline, so a good source for a
version number. GoCD allows manual re-running of stages, so it's best to
combine it with GO_STAGE_COUNTER. In terms of shell scripting, using
$GO_PIPELINE_COUNTER.$GO_STAGE_COUNTER as a version string sounds like a
decent approach.
But, there's more. GoCD allows you to trigger a pipeline with a specific
version of a material, so you can have a new pipeline run to build an old
version of the software. If you do that, using GO_PIPELINE_COUNTER as the
first part of the version string doesn't reflect the use of an old code base.
To construct a version string that primarily reflects the version of the git repository, and only secondarily the build iteration, the first part of the version string has to come from git. As a distributed version control system, git doesn't supply a single, numeric version counter. But if you limit yourself to a single repository and branch, you can simply count commits.
git describe is an established way to count commits. By default it prints
the last tag in the repo, and if HEAD does not resolve to the same commit as
the tag, it adds the number of commits since that tag, and the abbreviated
sha1 hash prefixed by g, so for example 2016.04-32-g4232204 for the commit
4232204, which is 32 commits after the tag 2016.04. The option --long
forces it to always print the number of commits and the hash, even when HEAD
points to a tag.
We don't need the commit hash for the version number, so a shell script to construct a good version number looks like this:
#!/bin/bash

set -e
set -o pipefail
version=$(git describe --long |sed 's/-g[A-Fa-f0-9]*$//')
version="$version.${GO_PIPELINE_COUNTER:-0}.${GO_STAGE_COUNTER:-0}"
Bash's ${VARIABLE:-default} syntax is a good way to make the script work
outside a GoCD agent environment.
This script requires a tag to be set in the git repository. If there is none,
it fails with this message from git describe:
fatal: No names found, cannot describe anything.
Other Bits and Pieces Around the Build
Now that we have a version string, we need to instruct the build system to use
this version string. This works by writing a new entry in debian/changelog
with the desired version number. The debchange tool automates this for us.
A few options are necessary to make it work reliably:
export DEBFULLNAME='Go Debian Build Agent'
export DEBEMAIL='go-noreply@example.com'
debchange --newversion=$version  --force-distribution -b  \
    --distribution="${DISTRIBUTION:-jessie}" 'New Version'
When we want to reference this version number in later stages in the pipeline (yes, there will be more), it's handy to have it available in a file. It is also handy to have it in the output, so two more lines to the script:
echo $version
echo $version > ../version
And of course, trigger the actual build:
debuild -b -us -uc
Plugging It Into GoCD
To make the script accessible to GoCD, and also have it under version control,
I put it into a git repository under the name debian-autobuild and added the
repo as a material to the pipeline:
<pipeline name="package-info">
  <materials>
    <git url="https://github.com/moritz/package-info.git" dest="package-info" />
    <git url="https://github.com/moritz/deployment-utils.git" dest="deployment-utils" materialName="deployment-utils" />
  </materials>
  <stage name="build" cleanWorkingDir="true">
    <jobs>
      <job name="build-deb" timeout="5">
        <tasks>
          <exec command="../deployment-utils/debian-autobuild" workingdir="#{package}" />
        </tasks>
        <artifacts>
          <artifact src="version" />
          <artifact src="package-info*_*" dest="package-info/" />
        </artifacts>
      </job>
    </jobs>
  </stage>
</pipeline>
Now GoCD automatically builds Debian packages on each commit to the git repository, and gives each a distinct version string.
The next step is to add it to a repository, so that it can be installed on a
target machine with a simple apt-get command.
I'm writing a book on automating deployments. If this topic interests you, please sign up for the Automating Deployments newsletter. It will keep you informed about automating and continuous deployments. It also helps me to gauge interest in this project, and your feedback can shape the course it takes.